Paper Heart Wreath by Betsey McLawhorn
Level: 2
Time Frame: 45 – 60 minutes
Goals:
- To improve fine motor skills through bending and gluing paper so it takes a form or shape.
- To explore paper as a medium by learning a new way to manipulate paper to create a 3D object.
- To promote hand made gifts. Share with students how a hand made gift communicates to the recipient how much they mean to the giver. In doing so, students will appreciate the process and action, whether they are on the giving or receiving end in the future.
- Construction Paper
- Paper Cutter
- Glue
- Paper Clips
- Small Hole Punch
- String
Teacher Preparation:
- Cut construction paper in 1” wide strips. You can also cut a bunch that are 2” wide if you would like to have a choice of thickness for the wreaths.
Steps:
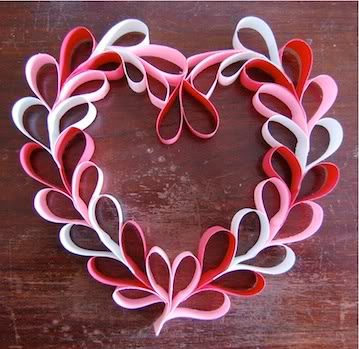
1. Fold a paper strip in half horizontally.
2. Place a line of glue along the inside crease at the bottom of the heart. Add a dab of glue on one of the outer sides of the top of the strip.
3. Bring the two tops together to form a heart. The glue on the outer side of the top strip will hold this together. Quickly bring the inside edge of the heart down to the line of glue at the crease. Attach a paper clip to keep it together until it dries. Make 21 hearts.

4. Allow the hearts to dry about 3 to 5 minutes after you’ve made the last heart. Remove the paper clips.
5. Inside one heart, run a line of glue along the inner edge (where the heart loops together). Place the bottom of another heart in to the glue line and paper clip together so it dries. Make a chain of 10 hearts. Repeat so you have two chains.

6. Allow to dry 3 to 5 minutes. Remove paper clips.
7. Glue the bottom two edges of the chains together. Paper clip so it can dry.
8. Apply glue to both sides of the bottom of an extra heart (this is heart #21). Place it between the outer two edges of the top two hearts so the chains come together to form a heart, and paper clip together.
9. Leave these paper clips on for 10 minutes (or leave them on and let the student remove it once they get it home to allow optimum drying time).
SOURCE: Arts For Life

No comments:
Post a Comment