Sunday, December 4, 2011

Stamped Salt Dough Ornaments


Here is a variation on the salt-dough ornament tutorial I did for Katy Elliott last year (for full instructions on making and cooking the dough, refer to that). I stamped these with ink after I rolled them out and before I baked them, using stamps and regular old stamp ink.

A few tips:
  • The recipe is simple - one part salt + one part water + two parts flour - but I find keeping the parts between 1/4 and 1/2 cup makes the most workable amount of dough. I make extra batches as I need them.
  • Nothing beats using a Kitchen-Aid for a getting perfectly smooth, chalk-white dough. It also eliminates the need to knead the dough at all.
  • A stamp pad with dry ink won't bleed. Using a light hand when inking also helps.
  • Stamp the designs before you use a biscuit cutter/glass/shape cutter to cut out the ornaments. 
  • If you roll the dough out directly on a Silpat, do your stamping and cutting and remove the excess, you will get perfect edges every time. It's trickier if you make them then try to move them toa  cookie sheet.
  • A smaller scaled ornament works best. The biggest of these is about 2.5". Any bigger, and it gets harder to dry them out.
Here are some made with Little Yellow Owl Workshop stamps (the snowflake is from another company):

I also made some using my favorite tree stamps. The stamps are wide and rectangular, but I cut circles out of the stamped dough. I love how these turned out:


They are slightly embossed:


Finish with a bit of embroidery floss and voila: ornaments. They would also make excellent gift tags - just use a fine-tipped permanent ink pen. They are so easy to make that you could whip up a batch or two over the weekend for last minute gifts.
 
Source: EvenCleveland  via Sandra Alexander on Pinterest

Thursday, December 1, 2011

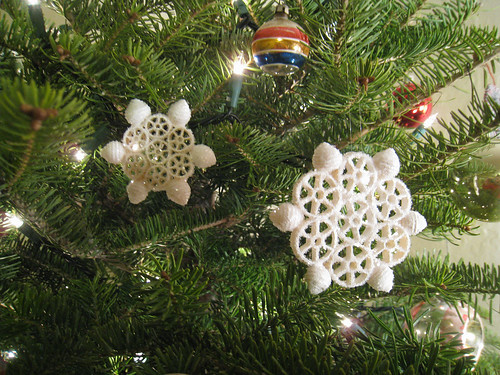
Macaroni Stars

3132226666 3c066f1479 Budget Gifts Ideas Winner!
A sweet and cost-effective gift for the holidays.


This is how you make them:
IMG 1985 748153 Budget Gifts Ideas Winner!
1. Select your macaroni – I used large and small wagon wheels, small shells, and fiori (flower shaped pasta).
2. Come up with your designs – this part is the most fun. I like to spill a few macaronis out and move them around, until I find the most snowflake-like arrangements. This year, I came up with ten different styles – the possibilities are only limited by your imagination (and the strength of your glue!)
3. Using a good strong craft glue (Like Aleen’s or Smart) and a small paint brush, apply glue generously to the edges of the pasta and attach the pieces to make your design. Once they are put together, I like to lay them out on wax paper to dry. Let glue dry completely, making sure to rotate your snowflakes periodically. This prevents them from sticking fast to your wax paper.

IMG 1987 748158 Budget Gifts Ideas Winner!
4. Using a large cardboard box, lay out a single layer of the snowflakes. Make sure that they are not touching each other. Spray lightly with glossy, fast-drying white spray-paint. Let dry. Re-apply in light layers, letting snowflakes dry in between, until they are completely coated. I spray the backs as well. As they are drying, give the box a few gentle shakes to keep them from drying to the bottom of the box. Make sure to keep the coats of paint light, or the macaroni will soften and start to lose it’s shape.
IMG 2051 719448 Budget Gifts Ideas Winner!
5. Once they are painted and dried, it’s time to apply the glitter. I thin my craft glue with a few drops of water, then use a sponge brush to lightly coat each snowflake with glue. Sprinkle generously with glitter, and let dry completely, Re-apply glitter as needed to cover any empty spots. I used large flake clear crystal glitter on these, but any glitter would look lovely – it’s craft magic.
IMG 2094 719455 Budget Gifts Ideas Winner!
7. Attach a looped length of ribbon or monofilament, and ta da! Macaroni snowflake ornaments!
I made mine white, but I think colorful ones might be fun, too. They make great garlands as well. I also tie them on the necks of wine bottles as little presents.
 
 
Sources:  

Saturday, October 15, 2011

Candy Corn Wreath


Preserve wreath and KEEP THE BUGS AWAY by following these directions FIRST:

Don’t have to let all your hard work go to waste after Halloween is over!  

1. Dry Out Your Candy Corn
Since candy corn is sweet—and therefore sticky—the most important thing you can do to preserve your handiwork is to let it dry out completely before you begin the project. This allows the natural moisture to evaporate, making it much easier to work with and less attractive to bugs. To do this, spread out the candy in a single layer on a metal baking sheet or wax paper. Store in a cool, dry place for 3 to 7 days until candy hardens, becomes stale and loses its sticky feeling.

2. Coat the Candy Corn
Once it’s been dried out, coat the candy corn with Krylon’s Preserve It! spray-on protectant to preserve the color and keep insects away, recommends a Michaels store manager. Lay candy on wax paper in a single layer and apply spray according to product directions. Follow the manufacturer’s recommended drying times for handling candy. Once the protectant has completely dried, flip candy over and repeat on the other side until drying process is done. Available behind the counter at most Michaels stores or at JoAnn.com.

Note: If you've already completed the wreath, you can still spray on a layer of Preserve It! to keep the bugs away. Apply several coats to the wreath and follow the manufacturer's drying times before hanging it up.
After October 31, simply wrap the wreath in plastic and store carefully in an airtight container in a cool, dark place.

1. You’ll need a Styrofoam wreath (ours is 16 in.), black duct tape, a hot-glue gun, a wide ribbon and candy corn (we used Brach’s).

2. Cover the wreath in tape.

3. To get a sense of how the corns will fit, lay them around the wreath in single rows, with one row pointing left and the next pointing right, but don’t glue down. (It won’t take long and your final product will be more polished.) Remove the corn from the wreath and hot-glue the pieces in the pattern one at a time, starting from the outer edge of the wreath inward, until you’ve covered the entire top and side.

4. Repeat the process in the center, starting at the same point as you did for the top so that you can cover any corn-free space with the ribbon when you’re finished.
5. Wrap ribbon through the wreath at the candy corn seam, tie into a bow and hang on a sturdy nail.


SOURCES:
Photos: Todd Huffman/Woman's Day
http://busybhomemaker.blogspot.com/2010_10_01_archive.html
http://www.womansday.com/Articles/Home/Crafts/Halloween-Craft-Candy-Corn-Wreath.html
http://www.womansday.com/Articles/Home/Crafts/Preserving-Your-Candy-Corn-Wreath.html

Sunday, August 14, 2011

Homemade Mod Podge

We made some! It was either that or skip the next mortgage payment!
 
This is a cinch.

You will need:
White school glue.
A jar with twice the volume of your glue
Yeah, that's it
 
Squeeze the glue into the jar. Fill the glue bottle with water. Seal and shake. 
Now squeeze that watery stuff into the jar. 
Seal and shake. 
 
Is it completely blended?
Yes?

Go decoupage something.  :-)

Friday, August 12, 2011

Recycled Carton Becomes Clever Carrying Case

Recycle a milk or orange juice carton into a clever carrying case for change, trading cards, and more. The carton's cap keeps the wallet closed.
Materials
  • Half gallon milk or juice carton with plastic cap, rinsed
  • Scissors
  • Paper towels
  • Tape
  • Wallet Template
  • Ballpoint pen
  • Ruler
  • Craft knife (optional)
  • Butter knife
X
Instructions
  1. Carton Wallet - Step 1 Cut open the carton so it lies flat, as shown; put aside the cap for now. Dry the inside with the paper towels. Tape the template on top of the carton so that the top circle lines up with the spout. Mark the outline of the template with a ballpoint pen. Using firm pressure, trace the lower circle and the dotted lines of the template so that they transfer to the carton. (This will score the lines for easier folding.) A ruler will help you mark the straight lines. Cut out the shape from the carton.
  2. Carton Wallet - Step 2 Use scissors to cut out the lower circle as marked. (Tip: To make cutting out the circle easier, first make an X with a craft knife.) Use a ruler and a butter knife to further score the fold lines.
  3. Carton Wallet - Step 3 Following the fold lines you marked, create an accordion fold on each side of the wallet.
  4. Carton Wallet - Step 4 Tightly squeeze the accordion folds. Fold the top flap down, pushing the spout through the hole. Screw on the cap to keep the flap in place.

    http://familyfun.go.com/crafts/carton-wallet-675068/

Saturday, August 6, 2011


I started making these eco planters for gifts a year ago and haven't stopped. They are simple, stylish and downright lovable. Each pot is unique and has an organic, handmade feel. It is not an instant gratification project and you will have to commit, but the results are well worth it. I like to make about six at a time.

 SOURCE: http://www.re-nest.com/re-nest/how-to/how-to-make-modern-cement-planters-using-packaging-132678

What You Need

Ingredients
Cement (it's the glue that binds the other ingredients)
Vermiculite (you can use sand instead, but the planters become very heavy)
Peat moss, pearlite, gravel or rock (add for fun!)
Materials and Tools
Gloves
Apron
Food containers
Plastic Bucket
Succulents
Shovel
3 - 9 x 12 pieces of sheet metal or plexiglass. (Approximate 9 x 12. Just an easy size to work with.)
Needle nose pliers
Scissors
Sand paper
Drill

Instructions

The ratio is one to four. One part cement and 4 parts anything else. To make six different sizes of planters shown here, we used 4 cups white portland cement and 16 cups vermiculite.
1. Collect recycled food packaging for molds. Pay attention to unusual shapes. Wash them and spread out to find proportional molds. For instance, a cottage cheese container in an ice cream container works well.
2. Combine the dry cement mixture in a plastic bucket using one part cement, and 4 parts vermiculite. Use gloves when mixing.
3. Slowly add water as if you were making dough, being sure to add the last part of water slowly. Humidity can affect how much water you need. It should be the consistancy of peanut butter. (It looked too dry to me but you will be suprised.) The mixture should clump in your fist and hold its shape. We used a drill to mix the materials but a shovel will work if you don’t have one. Be sure to wash it immediately after mixing.
4. Transfer mixture to one of your recycled containers.
5. Tap the container on your work space to make sure it settles in until the top is flat and even.
6. Push a smaller container into the larger one. Remove the displaced cement mixture and put it back in your bucket. I like to put it in off center to give it that cool modern look.
7. Place the sheet metal on top and flip it over. Move the container back and forth to get the top nice and flat. Leave to dry for at least 24 hours
8. To remove the molds, tear off the outside mold if it is paper or use a knife to cut off plastic molds. Pull out the inside mold with pliers.
9. Sand the edges smooth
10. To create drainage, drill holes in bottom. Let dry for at least two days before drilling.
11. Plant a succulent!

Wednesday, July 20, 2011

How to Make Boxes From Paint Swatches

Source:  http://howaboutorange.blogspot.com/2011/07/how-to-make-boxes-from-paint-swatches.html

If you've got paint chips sitting around begging to be made into something, try folding them into boxes for paperclips, thumbtacks, party favor candies, or tiny gifts. I made these from Behr swatches, available at Home Depot.

You'll need paint swatches, double-stick tape, an X-acto knife, ruler, and cutting mat.

For the box bottom, cut a 1/2" strip off each of the two rounded ends of the swatch. You should be left with a 5" x 5" square. At a point slightly more than 1 1/2" from one edge—about 1 17/32" if you want to be picky, but I just eyeballed it—score a line with your knife. Repeat on the remaining three sides. These scoring lines are shown as dashed lines above. Then cut out the gray shaded sections. This is what the box bottom should look like:

The box lid is constructed the same way. Trim a swatch down to a 3" x 3" square. At a point slightly less than 1/2" from one edge, score a line with your knife. Repeat on the remaining three sides and cut out the gray shaded sections.

Fold each sheet on the scored lines, bending flaps inward and securing them with double-stick tape.


Tuesday, July 5, 2011

Scrabble Pendants!

update-some of you have asked about the chains. they are silver boxed chains 16 inches long. my friend got them from this link.   She said they were the best price with the best shipping.


Put a coat of Elmers glue on the back side of your tile. The side without the letter.


Then stick it to a piece of scrap booking paper.


To make sure you have the tile where you want it, hold it up to the light. I wanted my tile right next to those 3 pretty little flowers.


Wait till the glue is dried. This will only take a few minutes.
Then place your paper on a cutting board. Cut around the tile through the paper with an exact-o knife.


Your tile will be left with some rough edges from the paper.


To take care of the rough edges we need to sand them down. You can do this with one of those metal nail files, or I just had some sand paper in the garage that I used. Start from the top of the tile where the paper is glued and sand down --- From the top down.

I know this is a terrible picture. You try sanding a tile, while taking a picture, without a tripod. :-)


Next cover the front of your tile and the sides with one of my very best friends - modge podge.


Wait till that dries. It won't take long.
Then cover the top of your tile with Diamond Glaze (link for diamond glaze), starting from the outside working your way in. Do not use too much. Just enough to cover the top.
You will probably end up with a few tiny little bubbles. So take a needle or something sharp and pop them. Some of them were a little hard to pop, so I just carefully scooted them off.


This will take a few hours to dry. When it's dry put a little drop of super glue on the back of your silver bail. These can be found on ebay or etsy as well. Here is an etsy shop that I found that sells them.


Stick it to the back of your tile. Let it dry just a few minutes and you're done!

These are so fun to make! So go get the stuff, invite your friends over, and have a little scrabble pendant making party!

TIP-  If you look on etsy they have these really great craft making kits sometimes. They give you all the stuff to make whever it is you want and instructions as well.   Here is a great link to one for these scrabble tile pendants kits.

http://treyandlucy.blogspot.com/2008/11/scrabble-pendants.html